How to Choose the Best Lighting for a Small Greenhouse

Time:2026-10-08 Author:Charlotte
0%

Choosing lighting for a small greenhouse is not simply a matter of buying the brightest fixture. Plant performance depends on spectrum, daily light integral (DLI), photoperiod, heat, and electricity use. The practical question is: What kind of lighting do I need for a small greenhouse? The answer changes with crop type, season, glazing, and local sunlight.

Research-based guidance supports this approach. The U.S. Department of Energy’s 2023 Solid-State Lighting R&D Opportunities report highlights LED efficiency, controllability, and thermal management as key development priorities. These factors matter in a compact greenhouse, where excess heat can quickly raise leaf temperature. University extension guidance from Cornell and Michigan State also recommends measuring light at canopy level, rather than trusting fixture wattage alone. A 30-watt lamp may look powerful above seedlings but deliver weak PPFD at the leaves.

Small spaces magnify mistakes. Leafy greens often need less light than fruiting tomatoes, peppers, or cucumbers. A timer, dimmable LED fixture, and PAR meter can provide better control than a simple on/off bulb. Aim for even coverage across the growing bench, including the corners where seedlings often stretch. Keep fixtures away from wet surfaces, use outdoor-rated electrical equipment, and monitor temperature beside the canopy. Safety still matters.

A useful starting point is comparing the crop’s target DLI with available daylight. The U.S. Department of Energy and controlled-environment agriculture researchers both emphasize that efficiency should be evaluated alongside light output and operating cost. Still, no universal setting works perfectly. Real plants may respond differently. Test one area, record growth, and adjust gradually. That honest feedback is often more valuable than a perfect-looking specification sheet.
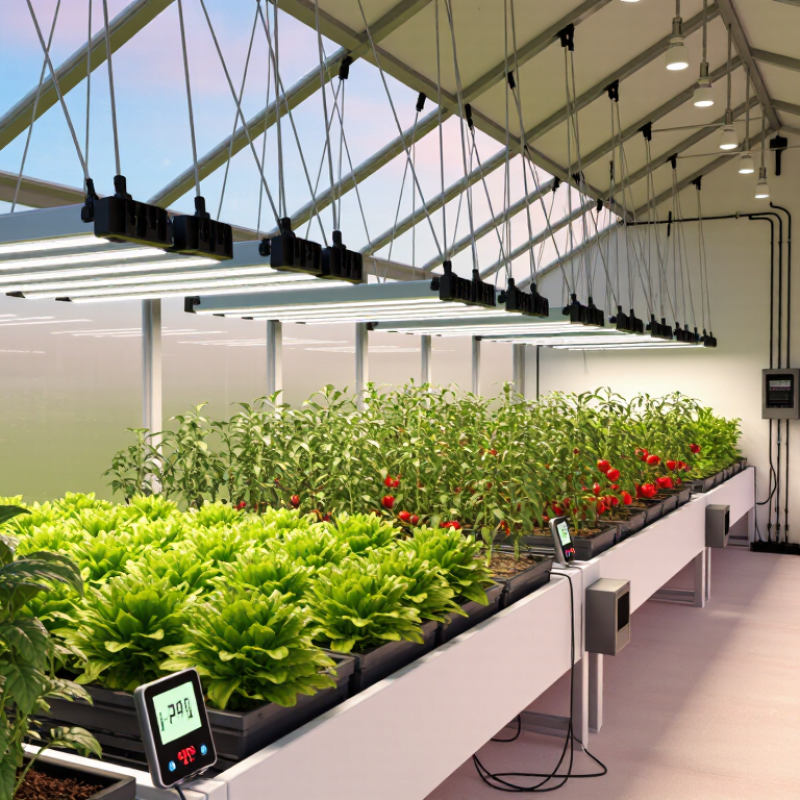
How to Choose the Best Lighting for a Small Greenhouse

Assess Your Small Greenhouse’s Light Requirements

Assess Your Small Greenhouse’s Light Requirements

Before choosing a light, watch how sunlight moves through the greenhouse. A sunny winter morning can still leave the back shelf dim. Record bright and shaded areas at 9 a.m., noon, and 3 p.m. for several days. A simple light meter gives better evidence than guessing by eye. I once treated a pale corner as bright enough. The seedlings disagreed.

Different plants need different light levels. Leafy greens often tolerate softer light, while tomatoes, peppers, and cucumbers need stronger, longer exposure. Check each crop’s recommended daily light requirement from a reliable horticultural source. Measure the greenhouse during the weakest season, not only on a clear summer day.

Cloudy glass, dirty panels, nearby walls, and winter sun angles can reduce usable light. Small changes matter.

Look for plant signals. Thin stems, wide gaps between leaves, and slow growth often suggest insufficient light. Bleached leaves may indicate excessive intensity or heat instead. Light and temperature work together. A bright lamp above dry soil can stress young plants quickly. Keep a simple log of light readings, plant growth, watering, and leaf color. It may feel excessive. It helps reveal patterns. Leave room for correction, because the first setup rarely fits every shelf or season.

Compare Natural Light with Supplemental Lighting

Natural light is free, broad-spectrum, and usually the best starting point for a small greenhouse. Yet sunlight changes with season, weather, glass clarity, and frame shadows. A bright winter afternoon may still provide too little energy for tomatoes or peppers.

Measure daily light integral (DLI), not brightness alone. DLI records usable plant light in mol/m²/day. University extension guides commonly place lettuce near 12–17 mol/m²/day, while fruiting crops may require 20–30. The U.S. Department of Energy’s 2023 SSL R&D report lists advanced horticultural LED systems above 3.0 μmol/J. That efficiency can make short evening lighting practical. However, electricity costs and heat management still matter. Supplemental lighting should fill dark periods, not automatically replace sunlight. I have found that a timer without a light sensor often runs too long. Plants may look healthy, but growth becomes softer and energy use quietly rises.

Tips: Install a PAR sensor at canopy height. Check the reading near noon and after sunset. Use dimming or shorter photoperiods when sunlight is strong. Keep lamps above moving plants, because uneven height creates uneven growth. Clean glazing and remove nearby obstructions first. A simple light log helps reveal mistakes. It may also expose an uncomfortable truth: the cheapest fixture is not always the cheapest system.

How to Choose the Best Lighting for a Small Greenhouse - Compare Natural Light with Supplemental Lighting

Comparison Dimension Natural Light Supplemental LED Lighting Supplemental High-Pressure Sodium Lighting
Primary energy source Sunlight entering through the greenhouse covering Electricity converted into photosynthetically useful light Electricity converted into light and substantial radiant heat
Typical light availability Strong during clear, long summer days; limited by clouds, latitude, shading, and short winter days Available whenever scheduled, including cloudy days and nighttime Available whenever scheduled, but fixture operation can add heat to a small space
Light control Limited control; depends on weather, season, greenhouse orientation, glazing cleanliness, and shading High control over intensity, timing, and daily light exposure when paired with a timer or controller Good schedule control, but dimming and precise intensity control are generally more limited than with LEDs
Approximate photosynthetic photon efficacy Sunlight is naturally efficient; no electrical fixture efficacy applies Often about 2.0–3.0 micromoles per joule for modern horticultural fixtures; actual performance varies Often about 1.5–2.0 micromoles per joule, depending on lamp and fixture design
Heat contribution Provides solar heat during the day, but greenhouse heat loss can be significant at night Produces less radiant heat than high-pressure sodium fixtures; may require separate heating in cold conditions Produces considerable heat, which may help in cool weather but can increase ventilation needs
Installation cost No lighting fixture cost, although glazing, orientation, and site preparation affect total greenhouse cost Usually higher purchase cost than basic lamps, plus wiring, mounting, and electrical safety equipment Often lower fixture cost than premium LEDs, but requires suitable mounting, ventilation, and electrical capacity
Operating cost No direct lighting electricity cost; cleaning, shading management, and climate control still require effort or energy Electricity cost depends on fixture wattage, operating hours, local utility rates, and target light level Typically higher electricity use for the same useful light output than efficient LEDs
Maintenance Keep glazing clean and manage condensation, algae, dust, and shading materials Generally low maintenance; remove dust and check fans, drivers, wiring, and mounting hardware Lamp replacement is needed periodically; fixtures and lamps require careful handling when hot
Effect on plant growth Provides a broad natural spectrum and supports strong growth when daily light is sufficient Can provide consistent supplemental light and precise photoperiod control; spectrum should match crop needs Provides useful broad-spectrum light and heat, but may require greater distance from foliage because of heat output
Best fit for a small greenhouse All growers, especially when the structure has a clear roof, good orientation, and adequate seasonal sunlight Growers needing quiet, efficient, controllable light in a compact space or during short winter days Growers who can use the extra heat and have enough clearance, ventilation, and electrical capacity
Main limitation Unreliable intensity and duration during winter, cloudy weather, and periods of heavy shading Requires electricity and careful placement to achieve even coverage without wasting light Higher heat output, greater energy use, and more frequent lamp replacement than many LED systems

Note: Actual performance depends on crop type, greenhouse latitude and orientation, covering material, fixture height, operating schedule, electricity rates, and local climate.

Choose the Right Light Type for Your Plants

In a small greenhouse, light type matters more than wattage alone. Start with your plants’ needs. Leafy greens usually tolerate broad, cool-white light. Tomatoes, peppers, and cucumbers need stronger light during flowering. Full-spectrum LED fixtures are often practical because they produce less heat and waste less electricity. The U.S. Department of Energy reports that LED lighting can use at least 75% less energy than incandescent lighting. Modern horticultural LEDs commonly reach 2.0–3.0 micromoles per joule, according to a 2023 review in Horticulturae.

Measure light at leaf height, not at the ceiling. A fixture can look bright while delivering weak photosynthetic light. Use a PAR meter when possible. For many seedlings, 100–300 µmol/m²/s is a useful starting range. Fruiting crops may need 400–800 µmol/m²/s, depending on daylight and growth stage. These figures should guide adjustment, not replace observation. My first setup was too intense. The leaves curled before I noticed the dry air.

Tips: Choose dimmable LEDs and keep a simple light log. Record daily hours, leaf color, stretching, and temperature. Provide gentle airflow around the canopy. A timer helps maintain consistency, while adjustable hanging height prevents sudden stress. The DesignLights Consortium’s horticultural lighting data also emphasizes efficacy, spectrum, and photosynthetic photon output when comparing fixtures. Do not choose by brightness claims alone. Check coverage, heat, warranty terms, and measured output. A cheaper fixture may demand more electricity or replacement work later.

Match Light Output, Coverage, and Energy Use

How to Choose the Best Lighting for a Small Greenhouse

Match light output, coverage, and energy use before comparing fixture prices. Plants respond to photosynthetic photon flux density, or PPFD, not ordinary brightness. A handheld quantum sensor can reveal dark corners beneath leaves. Aim for even coverage across the growing surface, because one intense hotspot can stress seedlings while nearby plants stretch.

The DesignLights Consortium’s horticultural lighting requirements evaluate fixtures by photosynthetic photon efficacy, measured in micromoles per joule. Many efficient commercial fixtures now approach or exceed 2.5 μmol/J, according to its qualified-products data. Higher efficacy usually means less electricity for the same photon output. The U.S. Department of Energy reports that LED lighting uses at least 75% less energy than incandescent lighting and can last up to 25 times longer. That comparison is not greenhouse-specific, but it still clarifies the value of efficient diodes.

Measure the shelf, not just the room. A narrow greenhouse may need two lower-output fixtures instead of one powerful lamp. Check the stated PPF, beam angle, dimming range, and recommended mounting height. Then calculate daily energy use: watts multiplied by operating hours, divided by 1,000. Ten hours at 200 watts consumes 2 kilowatt-hours. Simple arithmetic. Still, I sometimes overestimate light demand during bright spring weeks. A timer, dimmer, and weekly plant observations can prevent wasted power. Some unevenness may remain, especially near glazing, so adjust plant positions before buying more equipment.

How to Choose the Best Lighting for a Small Greenhouse

Compare typical horticultural lighting systems by usable light output, illuminated area, and electrical demand. Higher PPFD supports stronger growth, while broader coverage and lower power use can improve efficiency.

Values represent typical mid-range fixture configurations for small greenhouse applications. Actual performance varies with mounting height, reflector design, crop canopy, greenhouse glazing, and light loss.

Set Up and Adjust a Safe Greenhouse Lighting System

How to Choose the Best Lighting for a Small Greenhouse

Set up the lighting system around plant needs, not appearance. I once placed a bright fixture too close to seedlings, and their leaves developed pale, dry edges. Start with the plants. Seedlings usually need steady light for 14–16 hours daily, followed by darkness. Fruiting plants may require stronger intensity, but heat can become a hidden problem in a compact greenhouse. Use a timer, and check the leaves after several days.

Choose energy-efficient LED fixtures with adjustable brightness and a damp-location safety rating. Greenhouses contain condensation, wet floors, and sudden temperature changes. Keep electrical connections above the floor and away from irrigation lines. A qualified electrician should install protective devices required by local regulations, such as residual-current protection. Never rely on an extension cable lying across a walkway.

Mount the fixture securely, leaving enough space for air movement and plant growth. Begin with a higher position, then lower it gradually if stems become thin or stretched. A basic light meter can support better adjustments, although it cannot replace observation. Check leaf color, stem strength, soil moisture, and daytime temperature together. My own mistake was changing light duration and watering on the same day, which made the results difficult to interpret. Change one setting at a time, record the date, and inspect the plants each morning. Keep a clear path beneath the fixtures. Safety comes before maximum brightness.

FAQS

How should I assess light in a small greenhouse?

Observe sunlight at 9 a.m., noon, and 3 p.m. for several days. Record bright and shaded shelves. Measure, then adjust. A light meter is more reliable than guessing.

Why can a sunny greenhouse still have dark areas?

Frames, walls, dirty panels, and winter sun angles can block useful light. The back shelf may remain dim, even during a bright morning. Small shadows matter.

Which plants usually need stronger lighting?

Leafy greens often tolerate softer light. Tomatoes, peppers, and cucumbers usually need stronger, longer exposure. Check crop requirements from a reliable horticultural source. Do not treat every plant equally.

What does DLI measure?

Daily light integral measures usable plant light received during one day. It is expressed in mol/m²/day. Brightness alone does not show the full daily supply.

What DLI ranges may different crops need?

Lettuce often grows near 12–17 mol/m²/day. Fruiting crops may need roughly 20–30 mol/m²/day. These ranges are practical guides, not perfect rules. Your season and plant stage may change the result.

How can I tell that plants need more light?

Thin stems, wide spaces between leaves, and slow growth often suggest insufficient light. Watch the seedlings closely. I once misjudged a pale corner, and the seedlings disagreed.

Can plants receive too much light?

Yes. Bleached leaves may signal excessive intensity or heat. A bright lamp above dry soil can stress young plants quickly. Light and temperature must be considered together.

When should supplemental lighting be used?

Use it to fill dark periods, especially during weak winter daylight. Measure at canopy height near noon and after sunset. Shorter lighting may be better when sunlight becomes strong.

How can I prevent uneven growth under lamps?

Keep lamps at a consistent height above moving plants. Uneven distance creates uneven growth across one shelf. Use dimming or a timer carefully. A timer alone may run too long, and energy use can quietly rise.

Conclusion

Choosing the best lighting for a small greenhouse begins with understanding your plants’ needs, the greenhouse’s location, and the amount of natural sunlight available throughout the day. Ask yourself, “What kind of lighting do I need for a small greenhouse?” Sun-loving plants may thrive with natural light alone, while seedlings, herbs, and shade-tolerant crops may benefit from supplemental lighting during cloudy periods or shorter days. Evaluate light intensity, daily duration, and seasonal changes before selecting a system.

When choosing supplemental lighting, consider the type of plants, the growing area, and your energy goals. Select lights that provide suitable color quality and intensity, offer even coverage, and do not create excessive heat. Arrange fixtures at an appropriate height, protect electrical connections from moisture, and use timers to maintain a consistent schedule. Monitor plant growth and adjust the distance, duration, or output as needed. A safe, efficient, and flexible setup will help maintain healthy growth without wasting energy or overwhelming a small greenhouse.

Charlotte

Charlotte

Charlotte is a seasoned marketing professional with a deep understanding of the company's portfolio and a passion for elevating its presence in the market. With a keen eye for detail and a commitment to excellence, she ensures that our professional blog is regularly updated with insightful articles......